Summary
I wanted to extend the range of an existing wifi access point without cables or changing the configuration. It’s a temporary installation, and I doesn’t want do buy more hardware and use what I have on hand.
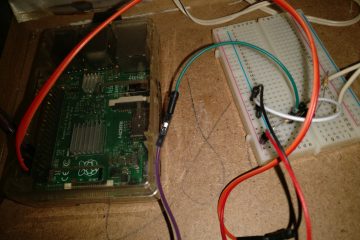
Hardware
- A Olimex Lime 2 board but anything running debian will work
- An Atheros AR9271 or any wifi card that support concurrent mode operation
Wifi concurrent mode
The wifi concurrent mode is a feature implemented in some drivers for wifi chipset allowing multiple virtual wlan network cards. Those can works in different mode like client station « managed » mode and access point mode at the same time.
You can check about it with iw list | grep 'valid interface combinations' -A3.
The Atheros AR9271 is compatible, but it’s a very old chipset, and only 2.4Ghz with one antenna.
As reported in this VERY good blog post, Ralink only support multiple access point but not managed+ap, Realtek doesn’t support anything. So you have Atheros chipset and Intel ones that have been reported to work.
How to
0. Hardware drivers
You may need to install some close source firmware for your wifi adapter for better performance or even have your wifi card working.
For Atheros based cards apt install firmware-atheros is enought.
1. Setup virtuals adapters with a iw and a udev rule
Insert the following into /etc/udev/rules.d/70-persistent-net.rules
SUBSYSTEM=="ieee80211", ACTION=="add|change", ATTR{macaddress}=="00:11:22:33:44:55", KERNEL=="phy0", \
    RUN+="/sbin/iw dev wlan0 del", \
    RUN+="/sbin/iw phy phy0 interface add ap0 type __ap", \
    RUN+="/sbin/iw phy phy0 interface add sta0 type station", \
    RUN+="/bin/ip link set sta0 address 00:11:22:33:44:56"
- You need to replace
00:11:22:33:44:55with the mac address of your wifi adapter,ip linkcommand should help you we that. - You need to replace
00:11:22:33:44:56with the mac address of your adapter +1, or something completely random as long as sta0 and ap0 will have different mac address.
2. The access point ap0 configuration
- Will use
hostapdstarted by ifup script
Create a file/etc/network/interfaces.d/ap0.confwith this content :
allow-hotplug ap0
iface ap0 inet manual
    hostapd /etc/hostapd/repeater.conf
2.1 The HostAPd configuration file /etc/hostapd/repeater.conf
interface=ap0
hw_mode=g
ieee80211n=1
wmm_enabled=1
macaddr_acl=0
auth_algs=1
ignore_broadcast_ssid=0
# you need the same channel as the client side
channel=6
#bss=hotspot0
ssid=Your_SSID
wpa=2
wpa_passphrase=yourpassphrase
wpa_key_mgmt=WPA-PSK
wpa_pairwise=TKIP
rsn_pairwise=CCMP
Your_SSIDcan be the same as your main access point.
3. The client station sta0 configuration
- Fully handle by ifup
- I explain all the commands just below
Create a file /etc/network/interfaces.d/sta0.conf with this content :
auto sta0
allow-hotplug sta0
iface sta0 inet dhcp
wpa-conf /etc/wpa_supplicant/wpa_supplicant.conf
  # 3.1 Setup the bridge between the two interfaces
  post-up /usr/sbin/parprouted ap0 sta0
  post-down /usr/bin/killall /usr/sbin/parprouted
  # clone the dhcp-allocated IP to eth0 so dhcp-helper will relay for the correct subnet
  post-up /sbin/ip addr add $(/sbin/ip addr show sta0 | perl -wne 'm|^\s+inet (.*)/| && print $1')/32 dev ap0
  post-down /sbin/ip addr del $(/sbin/ip addr show ap0 | perl -wne 'm|^\s+inet (.*)/| && print $1')/32 dev ap0
  # 3.22 bis DHCP Server in place of relay with `dnsmasq`
  # post-up /usr/sbin/dnsmasq --port=0 --interface=ap0 --dhcp-range=192.168.1.100,192.168.1.150 --dhcp-option=option:netmask,255.255.255.0 --dhcp-option=option:router,192.168.1.254 --dhcp-option=option:dns-server,80.67.169.12 --pid-file=/var/run/dnsmasq.pid
  # post-down /usr/bin/kill $(cat /var/run/dnsmasq.pid)
You need a WPA supplicant config file in /etc/wpa_supplicant/wpa_supplicant.conf
ctrl_interface=DIR=/var/run/wpa_supplicant GROUP=netdev
update_config=1
network={
  ssid="Main_SSID"
  psk="yourpassphrase"
}
3.1 Setup the bridge between the two interfaces
- We need to have the layer 2, bridged between sta0 and ap0
- As reported in Debian wiki you can use
ebtablesfor doing so. But you need to know each mac address and ip connected to ap0 and add manually the entry in ebtables. So I opt in for a more all-in-one approach and bridging network connections with Proxy ARP seems more easy to do. - Automating the process of bridging with arp proxy
You need to install parprouted with apt install parprouted.
So now the layer 2 is ok for unicast, but broadcast will not work for dhcp request so you need dhcp relay.
3.2 Dhcp Relay for Ip v4 with dhcp-helper
WARNING this will not work with some dhcp very regarding about source mac address which will be the same for multiple ip address. Like Freebox v5. So might try this but if it’s not working use the 3.22
Enable DHCP relay: /etc/default/dhcp-helper
# relay dhcp requests as broadcast to sta0
DHCPHELPER_OPTS="-b sta0"
3.22 bis DHCP Server in place of relay with dnsmasq
If DHCP relay isn’t working, we just need to add a DHCP Server listening on ap0 to deliver some ips outside of the main range.
1. apt install dnsmasq
2. uncomment this 2 lines in /etc/network/interfaces.d/sta0.conf
post-up /usr/sbin/dnsmasq --port=0 --interface=ap0 --dhcp-range=192.168.1.100,192.168.1.150 --dhcp-option=option:netmask,255.255.255.0 --dhcp-option=option:router,192.168.1.254 --dhcp-option=option:dns-server,80.67.169.12 --pid-file=/var/run/dnsmasq.pid
post-down /usr/bin/kill $(cat /var/run/dnsmasq.pid)
4. IPv6 support
- I haven’t successfully made ipv6 work but I leave some clues here.
- You need 2 things for ipv6 to work, a mean to deliver some address and a way to do arp for the layer 2 aka Neighbor Discovery Protocol.
- I found this article very helpfull IPv6 NDP proxy
4.1 Radvd
- First you can run
radvdumpto capture a starting configuration. - A lot of provider use SLAAC to allocate address in v6.
Example of SLAAC radvd configuration file
interface ap0
{
    AdvSendAdvert on;
    # Note: {Min,Max}RtrAdvInterval cannot be obtained with radvdump
    AdvManagedFlag off;
    AdvOtherConfigFlag off;
    AdvReachableTime 0;
    AdvRetransTimer 0;
    AdvCurHopLimit 64;
    AdvDefaultLifetime 1800;
    AdvHomeAgentFlag off;
    AdvDefaultPreference medium;
    AdvLinkMTU 1500;
    AdvSourceLLAddress on;
    prefix 2a01:xxxx:xxx:xxx::/64
    {
        AdvValidLifetime 86400;
        AdvPreferredLifetime 86400;
        AdvOnLink on;
        AdvAutonomous on;
        AdvRouterAddr off;
    }; # End of prefix definition
    RDNSS fd0f:ee:b0::1
    {
        AdvRDNSSLifetime 86400;
    }; # End of RDNSS definition
};
- Once
radvdconfigured and started your clients onap0should obtain some ipv6 address. - But these will not work out of the box because the main router can’t know that these adress are used and reachable.
4.2 ndppd
ndppddaemon will forward Neighbor Solicitation messages to the clients. Then the cilents will respond with a Neighbor Advertisement for the router.
proxy sta0 {
    autowire yes # Not sure about this option
    rule 2a01:xxxx:xxxx:xxxx::/64 {
        iface ap0
    }
}

0 commentaire